7 Things About bottle drying rack Your Boss Wants to Know

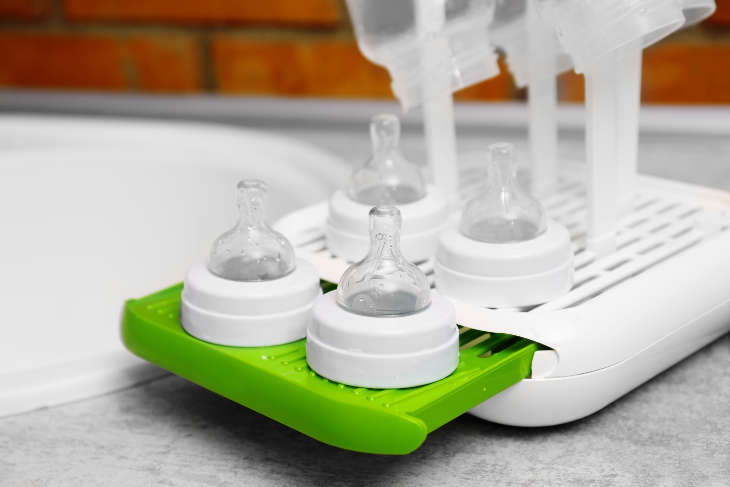
There might be something that is not quite common to realize, that is cleaning the baby bottle drying rack. Remember that this is the palce where you put your baby's cups, sippy cups, bottels, pouches to dry. With frequent use, it might let mold to build up, foot bits, and other nasty stuff. Though it looks clean from the outside, it might be really dirty on the inside. Here are some simple tips you can do to make sure that it stays clean all the time.
Or, if you wash it by hand, make sure that you do it often enough so it won't be too disgusting to clean. Drying rack is indeed tend to be forgotten to clean, but it will feel so much better once you know the rack is clean.
One important thing to keep in mind is that you need to make sure to wash your hands before hadling the baby's cups. Keep your phone out of the kithcen as well during the meal preparation and clean up as the surface of the phone likely has lots of germs that can transfer to the cups. Though it is not a 100% insurance to keep your child happy, and can not totally protect the germ from the daycare or playdate to get in, this is a least a simple process you can do to take safety measure.
Make sure that you wash the baby bottles right after use since it might develop caking milk on the bottle and creating a fould smell which could be difficult to get rid of. It is most likely to happen in plastic baby bottles. In glass baby bottles, stinky smell can be easily removed than the plastic ones.
With all the cleaning tools that is available, you always need a good drying rack for the baby bottles. Look for the ones that is made of safe material, and its portability so you can bring it easier when you're going on a vacation with your family.
For more information, you can go to https://www.amazon.com/Multifunctional-Hygienic-Countertop-Pacifier-Polypropylene/dp/B075GKTF2Q?psc=1&SubscriptionId=AKIAJWUNWFOQULLYMUQA&tag=earth-techshop0-20&linkCode=xm2&camp=2025&creative=165953&creativeASIN=B01CPAB0KQ
The Best Place to Put Dog Water Bowl

Dehydration in canines can be a major matter. It is also easy to prevent dehydration in pet dogs and it is extremely crucial to do so.
Dehydration in pet dogs can be triggered by health problem (especially if the dog has a fever), exposure to extreme heat, and a number of other factors. A canine's natural act of panting causes a loss of fluids and can result in dehydration if they are not replaced. A panting canine is a hot pet dog.
Preventing Dog Dehydration:
The finest way to prevent dehydration is to ensure your canine has a lot of fresh water available. The dogshould always have at least one complete bowl of water available at all times and, if the pet dog has the run of your house, bowls in various areas might be proper. Particularly in the hot summer months if you live in a dry climate canines must be kept inside your home as much as possible. When they are outdoors it is important that canines have an offered supply of fresh water. Wet foods likewise help maintain proper levels of bodily fluids in pet dogs. Dry foods are essential for a pet's oral health, however wet foods are a great idea.
Treating a Dehydrated Dog:
If you think that your canine is dehydrated, get it some water instantly and then get it to the veterinarian. Dehydrated canines will also experience a hold-up in capillary refill time. To test for this, pull the pet's lip away from its gum (gently) and push a finger against the gum until the area bleaches.
Lots of water is the best way to replace fluids, however a badly dehydrated pet dog must not be enabled to take in large amounts at when. Pedialyte, a water and electrolyte product sold for babies is suitable for pet dogs. Of course any pet dog that seems dehydrated or declines to consume need to be seen by a vet to identify suitable treatment and whether the dehydration is a symptom of some other disorder.
We have some pointers to avoid your pet from dehydration. The trick is using an automatic water bowl, with this, they can have fresh water source all the time. If you're searching for one, we suggest you get the one from MASTERPETZ.
https://www.washingtonpost.com/newssearch/?query=automatic water bowl
Are You Getting the Most Out of Your munchkin bottle drying rack?
Now that you are here, you may like to have some ideas for infant frames. Displaying your child images in your home has always been an excellent idea. Nevertheless, how should you show all those wonderful images of your baby inside the home? In this article, we have gathered some fantastic ideas that you can follow.
Best Ways on How to Frame Your Baby Photos in the house
There are a lot of ideas that you can take into account when it comes to framing your baby photos at house. Starting a DIY project can always be an excellent idea for you.
Prepare for Your Baby Photos Project
In addition to the child picture frame, there are some other things that you should keep in mind as you are preparing for the project. One of the most crucial points is where will you show the infant pictures.
1. Choose The Theme Of Your Baby Photos
As you are getting ready for the project, you need to choose a theme initially. There will be a lot of themes offered for your baby pictures job. The option of your time will not just impact how you will record the moment of your infant but likewise influence how you will choose for the photo frames for baby images.
2. Get The Equipment For The Photos Project
You ought to get all set with all the equipment required if you are preparing to capture all the minutes yourself. You can initially collect all the infant pictures bottle drying rack you have and after that pick some that are appropriate to you're the theme. You might wish to use whatever, however ensure to stick on the style that you have chosen prior to.
Create Your Baby Photos Frame
You can get prepared to develop your own picture frames as soon as you have actually discovered some of the finest images that meet the style you have picked. You can first find some best frame ideas on the web that is appropriate for your style. There is no doubt that you will find some baby keepsake picture frames that fit your taste.
1. Get the material for the picture frame
Depending on the concepts that you take, you will require to get ready for all the materials required. For a basic DIY task, there are some typical products to be prepared such as mat board, images, tape, and frame Then, you may require to prepare some tools like a ruler, pencil, box cutter and cutting mat as well.
2. Style your infant photo frame.
Now, it is the most interesting minute because you will develop the image frame. With all the materials supplied, you can start to change the photos to the frame and style it beautifully. After that, you can hang the pictures on the designated space you have prepared before. Ensure to get a keepsake image frame for your infant pictures!
If you're looking for the keepsake frame, we recommend you to get the ones from Baby Growth Collage. It comes in 12 little openigs and 1 big main opening for showing minutes of the infant's development from a newborn up to 1 year plus 1 month of age.
For additional information, go to
Find Out How to Use and Line Brownie Pan with Parchment Paper Like a Pro

Most knowledgeable bakers will advise lining a brownie pan with some pieces of parchment paper. Since the parchment paper can help to get the brownie out from the pan once it has actually baked and cooled, this is. However, how is the finest way to utilize and line our pan with parchment paper? Keep reading to learn more!
How to Line Your Baking Pan with Parchment Paper
If you find it hard to get your brownies or treat bars out of the baking pan once they are prepared by utilizing a spatula, parchment paper is undoubtedly the service. You simply require to line your baking pan with this paper for simple elimination. If you don't understand how to do it, this following info will tell you how.
Step-by-step for Lining Your Baking Pan Quickly with Parchment Paper
As you prepare your stainless-steel brownie pan, you need to not forget to take a piece of parchment paper or aluminum foil to make it much easier for you to get the baked brownie later. It is much better to do this initially before blending the ingredients. Here is what you can do to quickly line the parchment paper
Step # 1: Cut the parchment paper.
You need to cut the paper long enough to cover the bottom of the baking pan. If the paper is longer than the pan, you can fold the extra below.
Step # 2: Press a crease
After you cut the paper, you can put the paper over your stainless baking pan and then push a crease in the paper at each edge. You should do it to fit the paper tightly into the bottom of the pan. For additional neat edges, you can think about adding a second sheet of the paper going to the other direction.
Action # 3: Spray non-stick cooking spray
Next, you must not forget to spray non-stick cooking spray right now best onto the sides and bottom of your baking pan. If you have sprayed it, you can set the parchment paper on top. The cooking spray will assist the paper to penetrate the pan completely. When you are putting too, it will keep the paper from moving.
Additionally, spraying non-stick spray to copper brownie pan can likewise avoid the batter from dripping between the pan and the parchment paper. It is likewise an excellent concept to spray the top of the paper with this non-stick spray too. However, it is not really crucial since bars and brownies tend to not truly attached to the parchment paper.
A Final Word of Lining Your Baking Pan with Parchment Paper
In quick, parchment paper is an useful product to prepare when you are baking a brownie since it can help you to take the brownie out of the pan once it is baked. You ought to line the parchment properly by cutting it larger than your perfect brownie pan and then spray the pan initially prior to connecting the parchment over it.
We advise you to get the one from COMFECTO if you're looking for a best rectangular pan. It is made of safe products, and strong enough to sustain extensive use. The non-stick finishing enables you to develop perfect brownies, cakes with a gooey center and crisp edges. Plus, you'll get a totally free Ebook of baking dish which can be a guide for your baking activities.
For additional information, go to https://www.amazon.com/Rectangular-Brownie-Pan-Heatproof-Professionals/dp/B01HD39KTI?psc=1&SubscriptionId=AKIAIMQMD5XHFR3KGY5Q&tag=tp-catchall-20&linkCode=xm2&camp=2025&creative=165953&creativeASIN=B008B6Z7BW
Storage Rack: Where to Put It in the Kitchen

Now that you have actually bought a kitchen area storage rack, you may wonder where to put it in your kitchen area for the finest method. There is no doubt that storage rack can be a great service for providing more storage in your kitchen area.
Nowadays, there are actually lots of ideas to use when it comes to storage option. If your choice goes to a rack, you will have a bunch of alternatives.
You do not require to be panicked if you do not have any concept about where to install your storage rack. Thankfully, there are numerous manner ins which you can do to get one of the most of a storage rack in the kitchen. You can even combine it with the idea of under counter shelving. Check this following info for the inspirations.
Install it above the counter
One of the finest methods to install a storage rack is put as a floating rack above the counter. For you who do not have a set of cabinet set up above the counter, you can set up more than one rack as a storage service.
A plate rack is a great storage solution for you in the kitchen area. Hanging one above your sink can help you to access the plates quickly when you require them. More surprisingly, you can flaunt your collection of plates as a part of your kitchen design. In addition to a plate rack, you can get a pot rack too.
Shop above the windows
Rather of employing under cabinet wire baskets, it will be better for you to optimize your kitchen storage system by making use of the space above the windows. If you choose for storage rack and you have windows above your backsplash, this idea is surely perfect for you.
A storage rack or rack is not just excellent for being set up around the cooking area. It can be a great solution for your messy cabinets too. Now attempt to make it more controlled by adding a rack or rack inside the cabinet if you are merely saving everything in your cabinets. It will offer you more space to save things.
Other Storage Ideas for Your Kitchen
If you want to have more than simply a rack, there are really other storage solutions that you can have in your kitchen. You can simply set up some hooks above your backsplash and utilize it to hang cups, cutting board or even towels. You can also have under counter wire baskets in the cooking area.
As a means to get extra storage and optimizing the space in your kitchen, you can use the https://www.amazon.com/Under-Shelf-Basket-Organizer-Bookshelf/dp/B01M5KKE5V?psc=1&SubscriptionId=AKIAIIPJGO25BFQEGESA&tag=yourbestproduct-20&linkCode=xm2&camp=2025&creative=165953&creativeASIN=B01M5KKE5V&keywords=juicer industrial under cabinet rack from COMFECTO. It is an organization that needs no tools to install. To learn more, you can go to ## plainurl ##
A Complete Guide on How to Use a Tongue Scraper
You have had a tongue cleaner in your hand, however you end up sensation puzzled on how to utilize it properly. For those who have actually not scraped their tongue prior to, it is typical to feel nervous that they might use it incorrectly. In this short article, we will tell you how to scrap your tongue to make sure a healthy mouth.
How to Scrap Your Tongue with Scraper
Many individuals forget that tongue cleansing is also another crucial part of their oral health practices. There are numerous advantages that we can get from scraping tongue routinely.
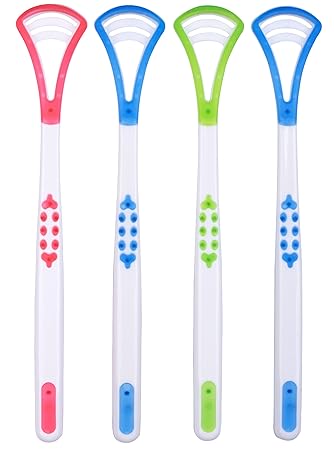
Tongue scraping is usually done with a scraper which is specially created to tidy tongue. There are a wide variety of scrapers offered in the market. In this point, consider your tongue's effectiveness, size, and convenience.
Of all, you require to open your mouth. You ought to not open your mouth too wide that it results in pain. By doing so, your tongue can be accessed more easily.
The goal here is to gladly improve the access of tongue scraper to your tongue. Thus, you require to stick the tongue outside your mouth as remote as you are capable of.
Next, it is the time to choose up your scraper. Hold the manage of your scraper and after that put it on the rearmost area of your tongue. How far to situate the scraper is absolutely based on your comfort. If you feel a tickle or a gagging experience, it indicates that you put it in too far.
Step 4: Start Scraping
Now is the time to carry out tongue cleaning with the scraper! Put company pressure to your tongue scraper and then pull it from back of the tongue to the front in a sluggish, smooth movement.
The last, it is advised for you to rinse your scraper along with your mouth after every stroke. You https://www.amazon.com/Bacterial-Tongue-Scraper-Cleaning-Treatment/dp/B01M2XQ0WM/ref=as_li_ss_tl?ie=UTF8&qid=1462290022&sr=8-3&keywords=tongue+scraper&linkCode=sl1&tag=marsdaiapp07-20 can think about dipping the scraper into a cup filled with mouthwash as well. Once you finish scraping your tongue, you should keep in mind to clean it too to eliminate saliva or particles before you keep your best tongue scraper.
We recommend you to get the one from Gusto Tongue Scraper if you're looking for the finest tongue scraper. They are made of safe product and designed to clean your tongue effectively.
Find out more through ## plainurl ##
Complete Guide to Tally Counter Usage
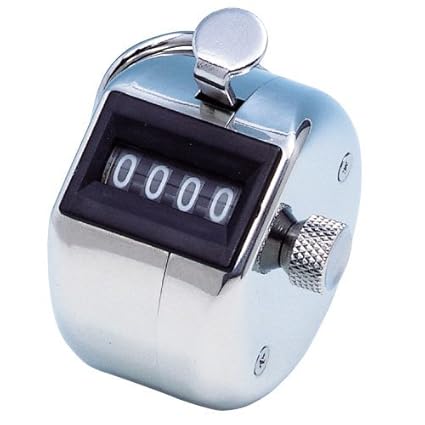
Now that you are here, you should be wondering how the mechanical tally counter is used for. Really, this tool can be utilized for numerous functions. As the name recommends, this tool is utilized to count something.
Before we are finding out about the common uses of these tools, it needs to be terrific to find out more about what tally counters are. Typically, a tally counter can be an electronic, software or mechanical gadget which is mainly used to count something. Whether you are utilizing the manual tally counter or the other types readily available, the functions of these tools are usually the very same.
Other than that, manual counters can likewise be utilized for other functions such as for examining the traffic, investigating something scientifically as well as counting inventory. In addition, it is possible for tally counters to be utilized for religious purposes.
So you have actually discovered some of the possible ways to use tally counters. In case you discovered that they are the tools that you need today, it will be the very best time to get one in the market. Which tally counter is perfect for your need? Here are a few of the elements to consider in picking tally counters.
Factors to Consider on Choosing Tally Counters
The very first thing to consider when choosing a mechanical hand counter is what you are going to count. Depending upon what you will count later, the kind of tally counters you require can be different. Second, you require to consider where you are carrying out the counter also.
For instance, if you are doing the counting on a night concert, you need to discover a counter which has backlight function so that you can still count even in dark areas. Next, it is also an excellent idea to take the speed of the important things you need to count too. Finally, you can get your finest manual hand counter clicker.
We recommend you get the one from On Tracker if you're looking for a terrific tally counter. It is made from premium material which last longer than any other counter.
For additional information, go to https://www.amazon.com/Mechanical-Resettable-Tracker-Baseball-Attendance/dp/B06XWQ7VT8?SubscriptionId=AKIAJARJ4L7EOHAM76IA&tag=dealdude-20&linkCode=xm2&camp=2025&creative=165953&creativeASIN=B06XWQ7VT8